- Kojaycat UK blog
- CLEARANCE BARGAINS
- Bulbs 12v LED
- 0.75mm² 14 Amp 18 AWG Tracer Cable
- Busbars Marine Grade
- Battery Power Distribution Boxes
- Battery Isolator Switches / Circuit Breakers
- Battery Terminals / Ring Terminals
- Cable 12v Automotive
- CONNECTORS: Automotive / Motorcycle
- Connector Boots (PVC)
- Connectors: Ducati, MV Agusta
- Connectors: Heat Shrink Terminals
- Connectors: Honda Loom
- Connector: ECU / ECM / CDI Wiring Plugs
- Connectors: Fuel Injector
- Connectors: Kawasaki Loom
- Connectors: KTM Wiring Loom
- Connectors: Regulator Rectifier Generator Stator
- Connectors: Suzuki Loom
- Connectors: Yamaha Loom
- Crocodile Clamps
- Fuse Boxes/ Holders
- Fuses Blade
- Harness Convoluted Tubing
- Harness Expanding Braid Sleeving
- Harness / Loom Tapes
- Harness PVC Sleeving
- Heat Shrink Sleeving
- Ignition Leads and Terminals
- Motorcycle Wiring Diagrams
- Switches Automotive
- Terminals Automotive
- Tools Crimping/Cutting
- Tow Bar Connections
- Warning Lights
- Wiring Looms / Motorcycle Parts
- Workshop Manuals
- Business hours
Auto Cable & Connectors How to crimp and assemble 6.3mm connectors
How to crimp and assemble 6.3mm connectors

This section explains to crimp and assemble the 6.3mm automotive wiring loom connectors in both latched and unlatched series.
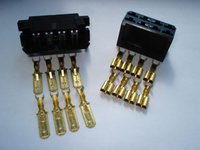
The 3 way 6.3mm tangless connector set before assembly
Strip around 4mm of PVC outer sleeving from the cable
Place the stripped cable end in the terminal as shown.
First part of the crimping process is to male a "W" shaped crimp over the bare copper strands using a non insulated crimping tool. TT71, TT73, 3000PR3 etc.
Second part of the crimp process is to make a "W" shaped crimp over the PVC outer sheath.
The next step is to insert the terminal into the housing until it clicks into place.
The crimped male terminal is inserted as shown.
the completely assembled connector. This process is used for 6.3mm 2, 3, 4, 6, 8, and 11 way connectors.
- Kojaycat UK blog
- CLEARANCE BARGAINS
- Bulbs 12v LED
- 0.75mm² 14 Amp 18 AWG Tracer Cable
- Busbars Marine Grade
- Battery Power Distribution Boxes
- Battery Isolator Switches / Circuit Breakers
- Battery Terminals / Ring Terminals
- Cable 12v Automotive
- CONNECTORS: Automotive / Motorcycle
- Connector Boots (PVC)
- Connectors: Ducati, MV Agusta
- Connectors: Heat Shrink Terminals
- Connectors: Honda Loom
- Connector: ECU / ECM / CDI Wiring Plugs
- Connectors: Fuel Injector
- Connectors: Kawasaki Loom
- Connectors: KTM Wiring Loom
- Connectors: Regulator Rectifier Generator Stator
- Connectors: Suzuki Loom
- Connectors: Yamaha Loom
- Crocodile Clamps
- Fuse Boxes/ Holders
- Fuses Blade
- Harness Convoluted Tubing
- Harness Expanding Braid Sleeving
- Harness / Loom Tapes
- Harness PVC Sleeving
- Heat Shrink Sleeving
- Ignition Leads and Terminals
- Motorcycle Wiring Diagrams
- Switches Automotive
- Terminals Automotive
- Tools Crimping/Cutting
- Tow Bar Connections
- Warning Lights
- Wiring Looms / Motorcycle Parts
- Workshop Manuals
- Business hours
